Thursday, September 27, 2012

Trunk Show Part 4 - First Steps into Modern

Wonky Squares Quilts

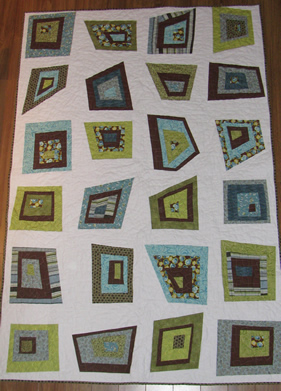
I'm in a community band.  When I mentioned that I quilt, three of my band mates said they always wanted to make a quilt, so, we started a little quilt group and met at my place when ever we could and each made two quilts.  We started with a Wonky Square quilt and each made blocks in our own colour palate, and level of wonkiness.

Here's mine

I was thinking about avocado and harvest gold appliances when I chose the fabrics.  Each block started with a slightly skew rectangle and was then built out in rings with different widths of the same colour.  At the end I squared up the blocks with white and used my 12.5 inch square ruler to cut it to size.  When I laid it out, the blocks were too close together, so I added in a 2 inch sashing of the background colour and got a nice overall wonky feel.  I quilted it in small overlapping rectangles on my oldest sewing machine - the one mom and dad got just after they were married.

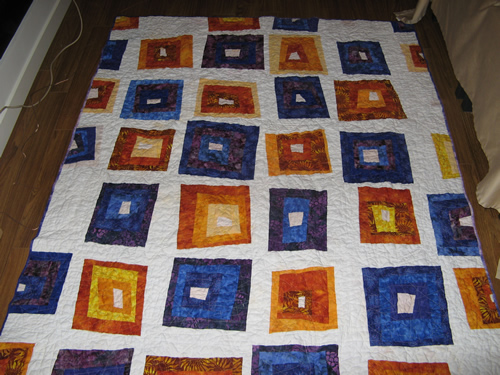
Kenzie's quilt was all yellow-orange and purple-blue.

Her blocks ended up more square and she "engaged the edge" by cutting some blocks in half and putting them around the quilt as if her quilt is just a small part of a larger pattern.  She used batics as well as prints.  She didn't use any sashing, and with these blocks, you really didn't need to get the intersections to match up, since it's all white around each block.  This is a really good beginner quilt since there's really no corners and seems to match up.

Lawanda's quilt is jagged blue, green and brown.

These blocks were trickier to square up since there's big areas of white triangles around most of the blocks.

Hisayo's quilt is pink and light green
IMG_0962_med
Half of her centres are black and half are maroon and two are green.  It took her forever to figure out how to lay it out such that she was happy with it.  Some people just can't embrace wonkiness! 

Here's all of the quilts together
Wonky Squares Quilts from our quiltcircle

Before we quilted them, we made a kids sized disappearing 9 patch quilt and practiced our quilting skills on them, then went back to the big ones.
IMG_0572_med disappearing 9 patch baby quilt
disappearing 9 patch baby quilt

Lawanda and I gave our quilts away to friends with babies.  Kenzie kept hers for her own baby boy who was born soon after the quilt was made.  We all used the same red sailors and yellow puppies and light blue boats fabrics.  I did 3 stacked coins strips across the back of mine and appliqued a P for Preston.

Monday, September 24, 2012

Trunk Show Part 3 - Still Pre-Modern

Here's some more traditional quilts that I made in the late 80s early 90s.

Irish Chains


Several quilts

The big green one on the back is a triple Irish chain that my mother and aunt hand quilted on a big frame in Chilliwack.  My aunt and oma have made thick satin quilts for all the girls for their weddings which were filled with a thick batting of carded wool.  The quilting in that kind of quilt is quite wide spread and contains hearts and diamonds in the borders.  Mom and Dad have one that got them through the Saskatchewan winters when they first married.  I had mom and aunty Martha just follow the dark green squares and do diagonal lines across the quilt.  This one got stolen from a house I was renting.  The police figured they wrapped all the stuff they took in it so it looked like they were just heading down the street to the laundry-mat or something.

The blue single Irish chain was for a good friend Michael who shared the house I was living in.  I think his mother has it now.  Single Irish chain quilts are easy to do.  Just make a bunch of 9 patches that look like the 5 face of a dice, then alternate them with solid squares the same size as the whole 9 patch. 

Stack and Whack


A stack n wack

I always wanted to do a stack and whack, but I really hated this one once I got this far.  So I gave it to a friend, Vince, who said he loved it and would finish it.  I think the feature fabric wasn't the best for this technique.  I think I got it because the repeat was very close so I wouldn't have to buy a lot to get 8 repeats for the pinwheels.  And I don't like the yellows or the green.  Makes me wonder why I even started it.

Sunday, September 23, 2012

Workshops

Now that I've facilitated some workshops, I guess I should somehow let people know.  So, here's a page of workshops I have given and some I'm ready to give.  All are a day long and there's enough time to produce at least 4 blocks using the techniques taught. 

Oh Frasson's Mod Mosaic Technique


This block is more of a technique than a pattern.  Using scraps, or strips of coordinating fabric you put together blocks of various sizes. 


Gees Bend Style Quilt


This block is also more of a technique than a pattern.  Big blocks are made then cut in quarters and re-assembled.  If you use pieced sashing, you get an all-over pattern.


Stack and Cut Technique for a Ripples Quilt


Libbie's Quilt Finished! by Quilt Circle
Libbie's Quilt Finished!, a photo by Quilt Circle on Flickr.


This technique involves stacking several fabrics, then cutting it with gentle curves.  Next you put the pieces back together alternating the fabrics.  With straight angled cuts you get a "Hop Skip and Jump" style quilt.  With curved cuts you get a ripple effect.


Paul's Pennants and Sailboats


This one uses a paper template to cut the triangles, then a nifty technique for insetting them into the background fabric with very little waste.  If you want pennants, you connect them with a thin strip, if you want boats, you make the triangles into sails and add a hull.  I used strips of 30's reproduction fabrics for this one.

ART_1434 ART_1427 
Here's photos from Sanja's flicker stream of my next and bigger version of the quilt
http://www.flickr.com/photos/artisania/
I used strips of 40's reproduction fabrics for this one.  You could also use a single fabric for each triangle, or sew together charm packs for blockier triangles.  Solids would make them look more like the signal flags that are used on big boats.


Paul's Christmas Tree Christmas Tree Skirt


With 8 big triangles and some thin strips for garland, you end up with a forest of Christmas trees around your Christmas tree.


Pickup Sticks


This technique is all about inserting one inch strips into a block.


Thursday, August 23, 2012

Quiltcon block

ART_1570 by sonjaartisania
ART_1570, a photo by sonjaartisania on Flickr.

Of all the ideas I had for a block for Quiltcon, this is the only one I got done.
I just received in the mail the latest "Modern Quilts Illustrated" by Ringle and Kerr and a quilt in there inspired me to adapt it down to block size. I hope it arrives in time.
The solids are the approved Kona colours and the rest is from my stash. I only had to buy some grey - not because I needed it, but because I NEEDED it.
The size requirements were 12.5 inches by anything, so I went big.

Monday, August 6, 2012

Trunk Show Part 2 - More Traditional Quilts

Here's more of my trunk show.  I'm still in my traditional phase here in the mid 90s.

 In 1993 I quilt my job at the Royal Bank and cut up my dress shirts to make this quilt top. The yellow zig zag isn't working for me, so I'll take that off when I finish it - if I ever do.


All of 94 I traveled through Africa from Cairo to Capetown using local transportation. This quilt is my diary of the trip.

In each town I visited, I would go to the tailor shops and ask for scraps of fabric. Once I had a few blocks done, I could just show them what I wanted the fabric for. Most of the fabric I got for free. I embroidered the name of the country, the town, and the name of the fabric, or the type of outfit that would be made from the fabric.

I have enough blocks made for two more quilts.

Thursday, August 2, 2012

Trunk Show Part 1 - Gramma Walker's Quilts

I tried to photograph all the quilts I have hanging around so I have a record of them.  I'm going to try to post them in sort-of chronological order.

But first I got to start with the quilts that inspired me to start quilting.

I think this is the oldest one I have from my Gramma Walker in West Virginia.  A nice red and white one that has a sort of Jacob's Ladder block set on point.

 This next one, I was told, was made from my mom and her older sister's dresses.  One wore red and the other wore blue.  I'm going to have to confirm it with Aunty Wanda.  These would have been made in the late 40s early 50s.

This yellow one is a quilt from the "missionary cupboard".  The church ladies in Hanna Alberta made these Bible verse quilts for the missionaries.  We must have had 3 or 4 of these growing up, but this seems to be the only one that survived - probably because we kept it here in Canada and didn't take it out to India.  This one has the verses drawn on with liquid embroidery tubes.  Can you find the misspelled block?

This is one of the older quilts I made while I was still making traditional quilts.  It's a very traditional log cabin quilt laid out in the straight furrows style.


And this last one is a nice scrappy block with several shades of light and dark grey.  I think the block is called the road home.  This one and the log cabin one are single bed size.

Saturday, July 14, 2012

6 months ago someone said something nice about me!!

I stumbled across this post that Lysa did when she received the pot holders I made for an exchange.  It's always great to find out someone is saying nice things about you!
Lysa's blog post about the pot holders I made

Thursday, May 10, 2012

Quilts for my nieces

I don't think I've shown these two quilts yet.  They are quilts I made for my nieces several years ago.

For the pink quilt, I stacked 4 pink rectangles  on top of 4 white rectangles, then cut them randomly with wavy cuts - 7 cuts in all.  Then I sewed them together alternating the pink and white matching curves, and using one of each pattern in the block.  I then squared it up so each block was the same height, not worrying about the width.  I think each block was 10 inches high by 15 inches wide.

Libbie's Quilt Finished! by Quilt Circle
Libbie's Quilt Finished!, a photo by Quilt Circle on Flickr.

Here's a link to a tutorial I put on Flickr stepping you through the process with lots of pictures.

I played with appliqueing circles for the back using the fat quarters of the pink that didn't go as well with the ones I used on the front.  I embroidered the label on one of the circles on the back.
Libbie's Quilt back by Quilt Circle
Libbie's Quilt back, a photo by Quilt Circle on Flickr.
My other niece requested blue and black.

I found this on flicker as a black and hot pink quilt, and adapted it for a bundle of black fat quarters I bought.  I worked out a size and layout where I could get 2 blocks from each fat quarter.  I bought 3 blue fabrics to use for the alternating blocks.

Katie's Quilt, front by Quilt Circle
Katie's Quilt, front, a photo by Quilt Circle on Flickr.

Katie's Quilt, back by Quilt Circle
Katie's Quilt, back, a photo by Quilt Circle on Flickr.
For the back of this quilt, I made an interlocking block type of back that turned out interesting.  I think I was sewing on the bindings of both of the quilts on the day before Christmas.


Both girls like their grown-up quilts.  Here they are with the first quilts I made for them ages ago.

Libby and her quilt


Katie and her quilt

Sunday, May 6, 2012

Gees Bend style Workshop

I did a Workshop for the Blue Mountain Quilt Guild on a Gees Bend style quilt.

Here's the technique in images:
build a block
cut in quarters
shuffle/rotate and sew back together

add improv pieced sashing between blocks.

Here's some of the amazing blocks the participants came up with:


What I find most amazing, is that even the fabric choices that I didn't think would work well produced interesting effects and really came together well.

I have made 4 of this style of quilt tops and have always used white or beige as the "background".  When I saw the fabrics that each participant had brought, I was sure we'd end up with some muddy, indistinguishable blocks.  I was surprised (and relieved) that everyone's blocks looked great when they were laid out.

I had everyone make 2 or more blocks at a time.  I under estimated how much time each block would take to make.  This being an improvised type of block and a room full of traditional quilters, I was surprised at how having too many choices slowed down the process.  A Bento Box block with every strip being 2.5 inches wide goes together really quick.  A wonky block where each strip is a different width, and each ring didn't have to be the same fabric and the fun of inserting little fabric inclusions in the middle of a strip all added up to the day being almost over, before everyone had 4 blocks to use for the second step.

Fortunately, everything still works with 3 blocks.  You can see form the layouts above, some have 3 blocks (12 quarter blocks) and some have 4 blocks (16 quarter blocks).  Most people had a couple more blocks on the go that they could finish at home to add to what we got done during the day.

The bottom image shows blocks made from thrifted material.  The gray is a duvet cover, the leopard and green are from sheets and the black is from a pinstriped shirt.