More quilts from the workshop.
I love his one. It's the colours and the retro feel to the printed fabrics that she used and all the solids. The squares with the dark grey strips were added later because the quilt was looking very pale.
 There are two more block to get added to the top or bottom to make it a bit longer. By blocks, I mean sets of 4 quarter blocks. There's actually a wide strip of pieced "sashing" that winds through the quilt. Can you find it? She actually got this all sewn together by the end of the workshop.

Jennifer used a dark grey as her background colour. The blocks were looking a little dark until she added in the orange and yellow. Look at how wonky the angles turned out. She used pointy "squares" to start out the bulls eye and got lots of motion in her blocks. You can see a wide strip of pieced "sashing" going up and down. Jennifer has more on the go to add in and she may make another block or two also. I can't believe I didn't get more pics of this quilt while it was being made.

I didn't get a shot of this one while it was on the design wall. We didn't have enough room once people got 4 or more bulls eye blocks cut up. This one had a bit of a tailored look and there's thin piping along the seams of some of the blocks. I like how the grey and yellow fabrics go together so well. Great choices! I hope she'll send me a picture of the finished quilt top. I want to know how she'll put it together. Will there be pieced sashing?

Here's another one without a white background. I love the solid blocks that are scattered through the quilt. They will be a great place to feature some fancy quilting. This quilt got done in half the time as she had to miss the first day of the workshop.
 Notice there's some mini bulls eye blocks as well as the big quarter size blocks. The mini ones have a cool folded centre square that adds a bit of 3D texture to the quilt. I think she's going to make some more blocks to get this up to queen size.I got a quick lesson on how to do the fold to make that on-point square. I just hope I can remember that special move after you do the first two centre folds.

Dale used a light batik for the background colour and a nice daisy print for the centre of each bulls eye. This one turned out looking very restful and sweet, not the the angular grey and orange one sharing the design wall with her. She added background sashing to two sides of each block then got this up and down layout where the blocks are not all lined up in rows but sort of bounce around the quilt. Most quilts made with this technique end up very angular and angry and a bit jarring, but here's one that looks pretty calm.

Carol's quilt blocks start out looking really west coast. I love all the black and white prints she used and that red is perfect. This layout isn't what she'll probably end up with. We were just placing blocks and pieced sashing strips anywhere to get an idea of what could work.


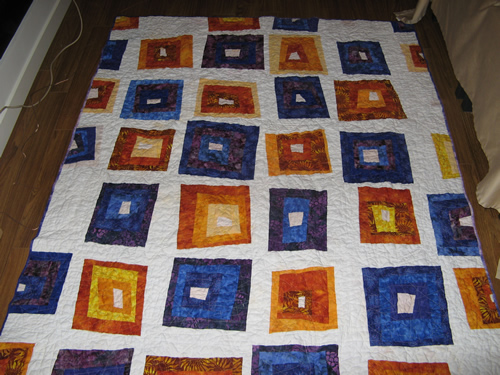
This one is another one with batiks and features a bright centre block
 More blocks are being created to increase the size. Looks like there will be orange centers mixed among the yellow centers. I really like the mix of wide and narrow strips of the colourful batiks. The judicious use of bright red and dark blue scattered around all the similar greens really make this top interesting. Note all the inclusions in the coloured strips and in some of the white background. I think when the orange centered squares get mixed in it will look warmer perhaps.

I love his one. It's the colours and the retro feel to the printed fabrics that she used and all the solids. The squares with the dark grey strips were added later because the quilt was looking very pale.

Jennifer used a dark grey as her background colour. The blocks were looking a little dark until she added in the orange and yellow. Look at how wonky the angles turned out. She used pointy "squares" to start out the bulls eye and got lots of motion in her blocks. You can see a wide strip of pieced "sashing" going up and down. Jennifer has more on the go to add in and she may make another block or two also. I can't believe I didn't get more pics of this quilt while it was being made.
I didn't get a shot of this one while it was on the design wall. We didn't have enough room once people got 4 or more bulls eye blocks cut up. This one had a bit of a tailored look and there's thin piping along the seams of some of the blocks. I like how the grey and yellow fabrics go together so well. Great choices! I hope she'll send me a picture of the finished quilt top. I want to know how she'll put it together. Will there be pieced sashing?
Here's another one without a white background. I love the solid blocks that are scattered through the quilt. They will be a great place to feature some fancy quilting. This quilt got done in half the time as she had to miss the first day of the workshop.

Dale used a light batik for the background colour and a nice daisy print for the centre of each bulls eye. This one turned out looking very restful and sweet, not the the angular grey and orange one sharing the design wall with her. She added background sashing to two sides of each block then got this up and down layout where the blocks are not all lined up in rows but sort of bounce around the quilt. Most quilts made with this technique end up very angular and angry and a bit jarring, but here's one that looks pretty calm.
Carol's quilt blocks start out looking really west coast. I love all the black and white prints she used and that red is perfect. This layout isn't what she'll probably end up with. We were just placing blocks and pieced sashing strips anywhere to get an idea of what could work.

This one is another one with batiks and features a bright centre block

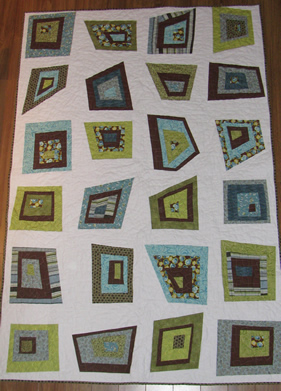
This one turned out unexpectedly wonky. The white fabric is a bit stretchy so some of the strips went a little wobbly, giving it a true Gees Bend look. The centers of the bulls eye are a black and white fabric and that inspired adding narrow black and grey sashing between the blocks. Look at all the little bits of colour in some of the black.

I am so amazed how different each quilt turned out. We all used the save technique, but personalities start showing through the blocks. I wonder as an exercize, what would happen if we all used the same fabric. How different would each person's blocks end up?
I'm hoping to get pictures from the quilters as they get the top together. I don't even need to see it quilted. I'd love to see the final version of the top. If it gets quilted, that would be a bonus! We really didn't talk much about how to quilt the tops other than me suggesting an all-over boxy stipple would work, or half inch apart 'L' shapes in each block would work too. Maybe something curvy would soften the quilt a bit, or maybe that would just look too out of place.
I think I talked everyone out of putting a border around their quilt. My thought is a pieced sashing keeps the wonky improv look going. Also no border makes it seem as if this may be a detail of a much larger piece of art. The doesn't end at the edges, but keeps on going on and on. A border would say, "This is it, there isn't any more." The binding is all you need to edge this type of quilt. The purple one on page 1 is probably the one that is closest to having a border, but since the internal sashing is just a wide, it's not really a border at all.
I came home on Sunday exhausted, but energized! I may even finish of a couple of projects in the next couple weeks!
Thanks, Sunshine Coast Quilters for a wonderful retreat!