Friday, October 7, 2011

At the Maker Fair


The VMQG had a booth at the Maker Fair that was held in Vancouver early in the summer.

Here's the booth with a couple of challenge quilts hung way up high, the demo table, a design wall where people rearranged hst blocks and a rack of quilts to oooo and aaaah over.


Several of us did 45 minute demos right through the day and people really seemed to enjoy us piecing and quilting.  I was working on my Bottled Rainbow challenge blocks and others did paper piecing, hand quilting, strip piecing...

vmqg maker faire 8 by crafty_dame

vmqg maker faire 8, a photo by crafty_dame on Flickr.


We were very low tech compared to the computer booths, robots, remote cars, walking vehicles, led lights and all the other mad technologies that were being displayed.

I've been a little lazy

I've been a little lazy blogging, but not quilting!

Back in August, I entered 3 quilts in the Ladner Car and Quilt Show.

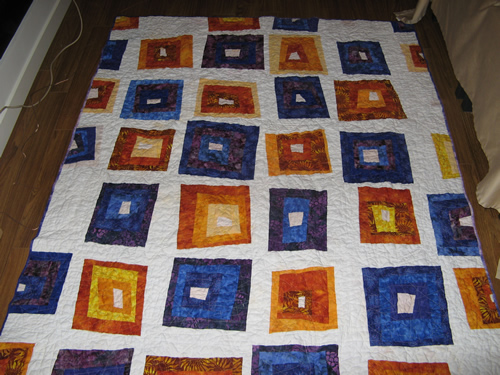
This mod mosaic one is the one the guild members made the blocks as one of the monthly challenges and I put together and quilted.  I am now an award winning quilter!
It won the people's choice for Modern/Contemporary Quilt.  The Vancouver Modern Quilt Guild was very pleased that a collaborative effort won a prize.  They were also a little surprized! since they didn't know I had entered it in the show.

Thursday, April 28, 2011

The Neighbourhood Quilt and my Quilting Buddy(s) from band

I was going through some boxes that were in storage and found my old camera and on it was pictures of a quilt I made a couple years ago.  Here it is.
This is a good time to introduce my quilting buddy, Lawanda.  She and I are in a band together, she plays flute and I'm on the euphonium and we've known each other for about 8 years now.  She did the quilting and the binding on this quilt.  Here's her loopy quilting stitch.
We made this one for a silent auction for the band we are in and it went for $120 at our concert!!  Here's the label we put on the back.


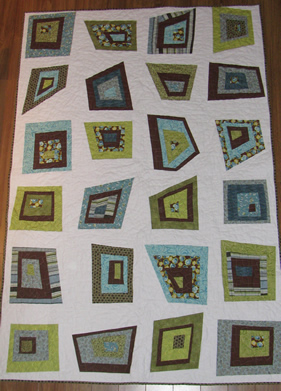
Three years ago she found out that I quilt and said she always wanted to learn how.  Within a couple weeks three other band mates and I started a weekly quilt circle.  I picked a wonky log cabin block for their first quilt and each of us went shopping and bought a bunch of fabric that were the colours we each liked.  I was very general about how much would be needed and how many fabrics to use and I opened up my stash once we all got some fabric so that we could all add more if we needed.  Lawand's fabric was browns and blues, Kenzie's was blue/purple and yellow/orange, Hisayo's was pale pink and green and mine was yellow, green and brown.

Oddly enough, all of us had a sewing machine that someone had given us, or left behind when they moved, so we had 4 machines set up in my garage.  We set up a cutting station and an ironing board that we all shared, and each had our own machine to sew with.  We cut strips of random width from our fabric then started with a square or 4 sided shape.  We added a strip on opposite sides, ironed, trimmed, then added strips on the two other sides, then ironed and trimmed again.  Then did it all for 3 or four rounds.  We ended with white strips around the entire block, then trimmed it down to a 12.5 inch square with a ruler.  Then we did it all 23 more times so we each had 24 blocks.


Kenzie plays euphonium too and has been in the band longer than Lawanda.  She alternated blocks of warm and cool and cut a bunch of them in half for the edge.  We had read about "engaging the edge" of the quilt and this way it looks like the quilt goes on and on and on.

My quilt is green, yellow and brown and a little more irregular.  The back has one huge block on one half and then 4 more to fill in the space of the other half.

 
Lawanda's blocks turned out really sharp and pointy.  I think they look really retro because of the blue brown green colour scheme.  She did a staggered little blocks strip on the back so it looks like a zipper.  I'm sure I've got a picture somewhere.

I can't find a picture of Hisayo's pink and green quilt, so I'll add that later.  She's another flute player and has been in the band for 3 years now.  I'm the ancient one in the band these days (20 years now).  I joined the band a month after it started.

These quilts are a great starting quilt for new quilters.  There are no exact seams to match and no corners to line up, so new sewers don't need to worry about accurate quarter inch seams.  By the time you're making your 20th block, though, you've gotten quite good at straight lines and being consistent with your quarter inch seams.  Squaring up the blocs at the end is easy too, just put the white strips around them then use a 12.5 inch square ruler to cut off the extra and square it up.  Sewing all the squares together isn't that hard, and if you're not matching the corners too well, it's not noticed since it's all part of the white background.  There's also no sashing needed - which can be a little hard for a beginner - so if you want the quilt bigger, just add more white to the squares and square them up with a bigger square like a 16.5 inch or a 18.5 inch square.

Wednesday, April 20, 2011

Pickup Sticks Quilt - Tutorial

After I made the Christmas Tree Christmas Tree Skirt last December, I put together a quilt top I call Pickup Sticks that uses the same technique.  This is a great quilt to show off Kona solids and to use up left-over strips of solids you may have from other projects. 
Here's how to do it:
Start with a 12.5 inch square and cut it crosswise 2 or three times
Cut a whole bunch of 1 inch strips from a selection of solids.

Sew the strips to the top fabric of each cut.
 Iron them open.
Trim the 1 inch strips so they match the edges of the piece they are sewn to.
Sew the sections together overlapping the ends so the 1/4 inch seam hits the edges exactly where the two overlaps cross.
Some of the overlaps will be less than others depending on how angled your cross cut is.
Here's the block with the four sections sewn together.
Iron everything open.
Cut the block across one or two times.
Sew in the strips.
Trim the ends to match the sides of the block.
Sew the sections together and iron the seams open.
Trim the blocks down to square them up.  If your seams are less than 1/4 inch you may be able to trim them down to 12.5 inch squares.  If you're inconsistent like me, you may be trimming all your squares down to 12 inches.

Make 24 blocks, varying the amount of cross cuts and varying the colours of the 1 inch strips.  The most cuts I made on a block was 5, the least was 3.  Sew them all together to get a 4 foot by 6 foot quilt top.

Tuesday, April 19, 2011

Hope Valley Wonky Squares

I fell in love with the colours and patterns in Denise Schmidt's Hope Valley line.  There's 8 coordinating fabrics and they come in three colour ways.  Fiesta is in orange and pinks, New Day in blues and grays and Piney Woods in yellow and green.
 I bought  half yards of the Fiesta and Piney Woods groups on Etsy.  Inspired by this set of quilts from Film in the Fridge, Here are my versions.
The orange and plum reminds me of the Tibetan monks that live in exile in India.  The little squares sort of represent prayer flags that you see tied on string hung between posts or rock piles in windy places in the mountains there.  It makes me want to visit India again! 
Diana Vreeland (editor of Vogue in the '60s) once said, "Pink is the navy blue of India."  I guess that means if you want to be conservative and not stand out in India, wear pink.
The Piny Woods colour way one has less going on for the background and ended up a lot bigger than the other.  I found the perfect colour for the background at Spool of Thread in Vancouver.  This is where the Vancouver Modern Quilt Guild meets on the third Thursday of the month.  They amazed us by buying the ENTIRE range of Kona solids!!  Every single colour that Kona has!!!  That's over 200 bolts of the most amazing range of colours.  It's so great to be able to walk into a store with a finished block and find just the right shade for the sashing or backing.
I ran out of the light green at the bottom left, so I pieced some little rectangles to fill in the empty spaces.  The blocks are quite big, were really randomly pieced and are all different sizes.  I just added the mid green around them in different widths to get them to even out so they would go together.  Then I ran a thin olive frame around outside to give them a boundary.  I didn't do a lot of planning, but I did try to balance the squares and the layout.

These are only tops so far.  I'll have to make backs for them and get them quilted. 

Saturday, April 16, 2011

Gees Bend inspired quilt

Last weekend was a rainy weekend in Vancouver, so I spent the entire time quilting.  While wandering through the quilt groups in flickr I came across a batch of quilts from a quilt class by Peppermint Pinwheels (here's her blog too). So of course I had to sit down and try it out immediately.  Here's my version:

First I made a couple of log cabin quilt blocks.  The ones in the pictures on flickr looked big, so I went 18.5  square.  I could have even gone bigger!  I made the strips random widths and made the centre of the blocks quite big, between 4 inches to 9 inches.

Then I squared them to 18.5 X 18.5 (I used a 12.5 square plus my 6.5  X 24 ruler)
Then I cut them into quarters by measuring in 9.25 and slicing down.  Without moving the block, I measured 9.25 from the top and then sliced it across.
Then I turned the quarters around, swapped one quarter with one from the other block and sewed them back together to get a nice graphic statement.
I made a total of 6 blocks this way and put them together with sashing.
I laid it out on the back of an older quilt and worked on the sashing.  I made the sashing with the end cuts for the block strips and with other strips.  The sashing between the blocks is 4 inches wide, the sashing on the outside of the blocks is 2.5 inches wide and the big strip down the middle is 5 inches wide.  OK, I didn't really plan for them to be all different widths.  I was just trying to get the quilt up to 4 feet by 6 feet, which I've decided is the perfect "curl up on the couch" size for a quilt.  I didn't do much planning on the sashing strips, just kept sewing strips and scraps together, then cutting them crosswise and attaching them to other strips.  I did try to get some solid parts, some stripes, some checkerboard and some crosswise bits, but didn't really plan out where they would end up. 

Then I made a bigger block for the back with just oranges and greens as I was totally out of the blue.  It started as a 26.5 inch log cabin block and was cut into 13.25 inch quarters.  When I put it back together I put 4 inch sashing between each quarter.  As you can see, I was down to half inch and less strips of orange and blue, so there are only slivers of those colours in the sashing.
Here's two last pictures of the front and back.